 MADE IN THE USA


Turn Your IKEA Storage from Ordinary to Rustic Chic with This Simple DIY Hack
- Measure the Cabinet Opening: Determine the width and height of the cabinet openings.
- Consult the Besta Cabinet Measurement Guide: For precise fitting, reach out to a designer by filling out our Free Quote for Refacing Cabinets form. IKEA typically subtracts 1/8" from the exterior dimensions of the cabinet box. Ensure you leave a 1/8" reveal between each door and drawer front.
- Capture Essential Pictures:
- Overall View with Tape Measure: Take pictures of the entire piece with a tape measure to confirm the reveals.
- Straight-On Pictures: Capture images of each piece directly to get accurate measurements.
- Back of Drawer Fronts: Photograph the back of the drawer fronts to see the bore pattern.
- 2 Drawer Fronts:
- One Drawer Front: 23.5” W x 15” H
- One Drawer Front: 23.5” W x 10” H
- 2 Cabinet Doors:
- Each Door: 23.5” W x 25” H
- Unscrew the IKEA screws from the back of the old drawer front.
- Attach the IKEA screws to the new drawer front and secure it onto the drawer box.
- Tighten the screws on either side.
- Begin by opening the cabinet door to access the hinges. Using a screwdriver, unscrew the hinges from the inside of the cabinet frame. It’s usually easier to start with the screws at the top or bottom of the hinge, depending on their positioning.
- Once the hinges are unscrewed, carefully remove the old cabinet door from the cabinet frame. If the door is heavy or large, you may need an extra pair of hands to hold it steady while you work.
- With the old door removed, inspect the cabinet frame for any debris or damage. Clean the area to ensure a smooth surface for the new door installation.
- Attach Hinges to New Doors:
- Take the new cabinet doors and align the hinges with the pre-drilled holes on the doors. Secure the hinges in place by screwing them into the new doors. Make sure they are tightly fastened but be careful not to overtighten, which could damage the door material.
- Position the New Doors:
- With the hinges attached, position the new doors against the cabinet frame. Align the hinges with the pre-existing hinge plates or mounting points on the cabinet frame.
- Secure the New Doors:
- Screw the hinges into the cabinet frame, securing the new doors in place. Start by attaching the screws on the top hinge and then proceed to the bottom hinge. Check that the doors are level and aligned correctly as you tighten the screws. Adjust as needed to ensure that the doors open and close smoothly without any gaps or misalignment.
Are you ready to give your IKEA Besta cabinet a stylish makeover? If you want to transform your plain storage into a statement piece with rustic charm, you’ve come to the right place. This simple DIY hack will guide you through upgrading your IKEA storage using custom cabinet doors and drawer fronts for a chic, modern rustic look. Follow along as we walk you through the process, step-by-step, to achieve a stunning result.
Step 1: Selecting New Cabinet Doors and Drawer Fronts
To start, choose the perfect replacement cabinet doors for your IKEA Besta cabinet. For a modern rustic charm, we recommend CabinetNow's modern thermofoil Shaker Slim cabinet door in Palomino.

CabinetNow’s Modern Thermofoil Shaker Slim in Palomino is an excellent choice for achieving rustic charm with a contemporary twist. This style combines the clean lines and minimalist profile of modern Shaker design with a subtle, textured thermofoil finish that enhances its rustic appeal. The slim profile offers a sleek, sophisticated look while retaining classic Shaker elements, and the Palomino color adds warmth and a natural wood feel, perfect for creating a cozy and inviting atmosphere.

If you're looking for alternative styles, you can also explore our selection of slab and classic Shaker doors, available in a variety of materials and finishes. These options allow you to further customize your cabinetry to match your design vision and project requirements. Our Modern Thermofoil Collection offers a range of colors and wood textures to find the perfect match for your project and elevate your cabinetry to a new level of style and functionality while on a budget.
Step 2: Measuring for New Cabinet Doors
Accurate measurements are crucial for a successful DIY IKEA hack project like using replacement cabinet doors. Here's a quick summary of the steps:
To ensure you get proper measurements for an exact fit, it’s essential to work with our experienced designers. Our team can provide expert guidance on replacing cabinet doors on IKEA cabinets, ensuring that every detail is accounted for. They will assist you in measuring your cabinet openings accurately, taking into consideration the specific dimensions and allowances required for a seamless installation. By collaborating with our designers, you can avoid common pitfalls and ensure that your new cabinet doors fit perfectly, enhancing both the functionality and aesthetic of your space. Their expertise will help you navigate the nuances of the replacement process, from precise measurements to selecting the right style and finish, ensuring that your cabinetry upgrade is a success.
Step 3: Understand Your IKEA Cabinet

For this DIY project, we’ll focus on upgrading the IKEA Besta Storage Combination with Drawers, White/Lappviken White (70 7/8x16 1/2x25 5/8"). To replace the exterior of this specific IKEA storage cabinet, you will need:
This project can be applied to any cabinet within the IKEA line that allows for custom cabinet door replacements. Whether you’re working with IKEA's Besta series or another cabinet style, the process remains largely the same.
To update your cabinet’s appearance, you’ll first remove the existing drawer fronts and doors, then install the new custom cabinet doors. For most IKEA cabinets, you can reuse the existing hinges and hardware, as these are generally compatible with a range of door styles and sizes. This method ensures a smooth installation of your new doors while retaining the functionality of your cabinet. By following these steps, you can achieve a fresh and personalized look for your IKEA cabinets, regardless of the specific model or line.
Step 4: Replacing Drawer Fronts

Start by upgrading the drawer fronts for an immediate boost in character:

1. Remove Existing Drawer Fronts:

2. Attach New Drawer Fronts:

3. Repeat the process on the other drawer front.
Step 5: Upgrading Cabinet Doors
Replacing the cabinet doors is a key step in transforming the look of your IKEA cabinet. Here’s a detailed guide to help you with this process:
Remove Old Cabinet Doors
1. Detach the Hinges:
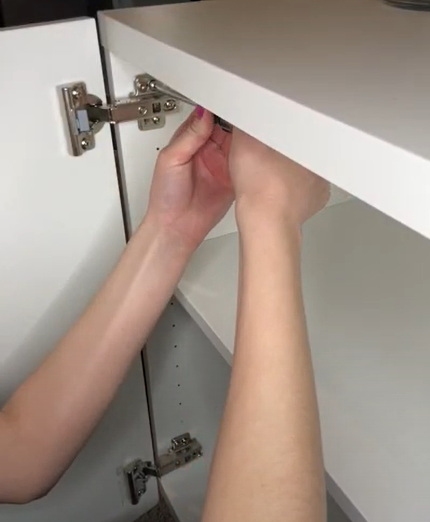
2. Remove the Existing Door:

3. Prepare the Cabinet Frame:
Install New Cabinet Doors
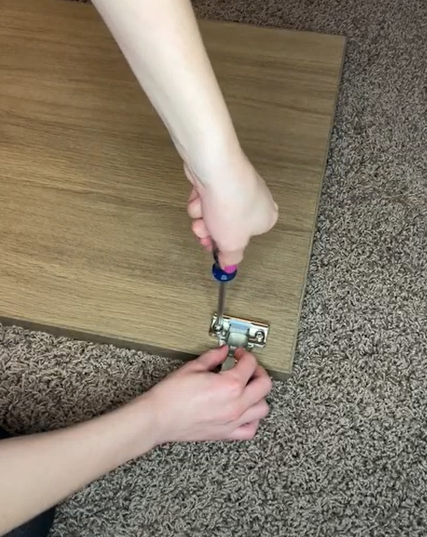

4. Test the New Doors:

By carefully removing the old doors and installing the new ones, you can significantly enhance the appearance of your cabinet. This process allows you to update the style and functionality of your IKEA cabinets, creating a fresh look that aligns with your design preferences.
Watch Our Full Tutorial on YouTube
Watch our full tutorial above to learn how you can DIY your IKEA cabinets with ease. With these steps, you’ve successfully transformed your IKEA Besta cabinet from ordinary to rustic chic. By replacing the plain white cabinet doors and drawer fronts with CabinetNow’s modern thermofoil Shaker Slim in Palomino, you’ve not only refreshed its appearance but also created a unique and stylish piece that adds character and warmth to your space. This DIY upgrade demonstrates how a few thoughtful changes can elevate the look of standard furniture, making it a standout feature in any room.
If you have any questions or need further assistance, feel free to reach out—we’re here to help! Email us at info@cabinetnow.com.
For more DIY tips, custom cabinetry solutions, and design inspiration, be sure to explore our other guides. Our team is always available to provide support and advice, whether you’re embarking on another home improvement project or seeking more information on custom cabinetry options. Get a free quote today below.

